|
|

December 17, 1998
This document describes software release 2.01 for the Cisco 1503 Micro Hub. The Micro Hub 1503 is a small desktop, 8-port hub to connect network devices in a home or branch office. You can monitor and manage the hub through the console port on the rear panel or by using Telnet. You can configure the hub with its own firmware or remotely, using optional network management software (such as CiscoView StackMaker).
This document contains the following sections:
This section describes the minimum requirements for using release 2.01.
Use the show version command to determine what software release your hub is currently using. In the following example output of the this command, the software version is shown in bold:
Hub# show version

    Cisco c1503 System Bootstrap, version 1.47 [bm], 64 Kbytes BootROM
    Compiled 22-Mar-1997 11:11
    Copyright (c) 1997 by Cisco Systems, Inc.

    Cisco c1503 (80386EX) processor with 2048 Kbytes memory
    Firmware version 2.01, hardware revision 01, 512 Kbytes FlashROM
    Compiled 26-Oct-1998
This section describes how to upgrade the software on your Cisco Micro Hub.
 | Caution Updating your Micro Hub software to a software release earlier than release 2.01 (for example upgrading from release 1.09 to release 1.15) will erase your existing configuration. |
You can upgrade your hub software in one of these ways:
This section describes the new features in release 2.01.
The console port now uses flow control.
This section describes open and resolved caveats for release 2.01 and release 1.15.
This section describes known problems for software release 2.01.
The Internet Control Message Protocol (ICMP) message "Destination Unreachable" and the MIB object icmpOutDestUnreachs are not implemented in this software release.
The ICMP message "Source quench" is not implemented in this software release.
This section describes problems in release 1.15 that have been resolved in release 2.01.
The show port information command now correctly reports link status as "connected" only when the link is connected. Following is example output of the show port information command:
Hub# show port information
Hub 1
Port Id  Admin Status   Link Status     Partition Status
---------------------------------------------------------
  1      enabled        not connected   not partitioned
  2      enabled        not connected   not partitioned
  3      enabled        not connected   not partitioned
  4      enabled        not connected   not partitioned
  5      enabled        connected       not partitioned
  6      enabled        not connected   not partitioned
  7      enabled        not connected   not partitioned
  8      enabled        not connected   not partitioned
The Cisco 1503 configuration will not be lost when upgrading from release 1.09 or release 1.15 to release 2.01.
The command-line interface to the hub software continues to respond correctly when the hub experiences heavy IP network traffic.
This section describes problems in release 1.09 that have been resolved in release 1.15.
The IP address assigned to the hub by using the bootp-get-ip option of the bootup-option command will be used by the hub, unless it is overwritten by using the ip address command to enter a different IP address.
The electrically erasable programmable ROM (EEPROM) does not become corrupted when rebooting the hub. EEPROM corruption results in unexpected hub behavior.
The front-panel LEDs no longer indicate that a port has been partitioned when it has not.
Incoming Address Resolution Protocol (ARP) packets are processed correctly.
This section contains changes to the Cisco Micro Hub User Guide that came with your hub.
Table 1 lists the changes to software-related information in the user guide.
| Page | Section | Correction |
|---|---|---|
3-2 | Connection Using Telnet | You do not have to restart the hub after setting or resetting the hub with an IP address. The hub will dynamically recognize a new or changed IP address. |
3-6 | Configuring the Hub | The second item in this section should read as follows:
|
3-6 | Configuring the Hub | An additional item should be added to the list of information that you should have available before configuring the hub:
|
3-20 | bootup-option | The factory default for the bootup-option command is bootp-get-ip, which configures the hub to obtain its IP address from the local BOOTP server. The bootup-option configuration is stored in the hub Flash memory. |
3-22 | start tftp-download | The status of the firmware download is not displayed on the terminal or PC screen when you enter the start tftp-download command. |
The Cisco Micro Hub automatically shuts off if its internal temperature reaches 185°F (85°C). If the hub shuts off for this reason, you can restart it after the internal temperature has cooled to 122°F (50°C) or below.
The time required for the hub to cool to 50°C or below can vary, depending on the ambient temperature, the number of hubs in the stack, and the position of a particular hub in the stack. The higher that a particular hub is located in a stack, the longer that hub will take to cool to 50°C. The cooling process can take from 5 to 45 minutes.
Use the procedure in this section if you forget the password used to access the hub administrator-level commands or if you forget the password required for Telnet sessions. This procedure should replace the one that begins on page 3-5 in the "Using the Hub Software" chapter of the user guide.
Step 1 Turn the hub OFF, and wait 60 seconds before going to Step 2.
Step 2 Turn the hub ON.
Wait while the following messages are displayed on the terminal:
Starting the system...
Boot option : boots get ip

Enter BOOTP phase, wait or press Ctrl-C to break...
.....
Bootup Error: Timeout, no response from BOOTP server.

Press RETURN to start a new session
Step 3 Press Ctrl-C.
Step 4 When the following prompt appears, enter a new administrator password:
New administrator password: <new_password>
Step 5 When the following prompt appears, re-enter the new password:
Confirm administrator password: <new_password>
Step 6 Perform the same steps when prompted to enter and confirm a new Telnet session password:
New telnet-session password: <new_telnet_password>
Confirm telnet-session password: <new_telnet_password>
The following message appears, confirming that the hub is configured with the new passwords:
Administrator and telnet passwords are modified.
Welcome to Cisco hub model 1503
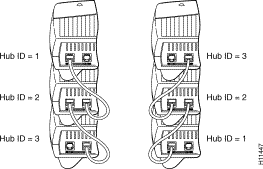
This section describes the rules that determine the ID number of a particular hub in a stack of hubs. The hub ID number is used to identify individual hubs in a stack of hubs.
You cannot manually assign an ID number to stacked hub. The ID number is assigned based on how the hubs are cabled together, not on the particular physical location in the stack itself.
1. The lowest hub ID number in a stack (1) is always assigned to the hub with another hub connected to its OUT port and with no device connected to its IN port.
2. The highest hub ID number in a stack (any number from 2 to 5) is always assigned to the hub with no device connected to its OUT port and with another hub connected to its IN port.
Figure 1 illustrates these rules.

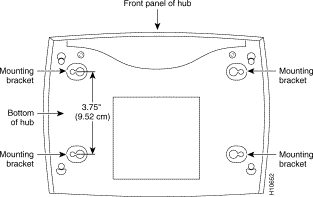
The Cisco Micro Hub can be wall-mounted using two number 6, 3/4-inch screws and the molded mounting brackets on the bottom of the hub. You must provide the screws. We recommend using pan-head or round-head screws.

To mount the hub on a wall or other surface:
Step 1 Install the two screws 3.75 inches (9.52 centimeters) apart (horizontally) on a wall or other vertical surface.
The screws should protrude 0.25 inches (0.64 centimeters) from the surface of the wall.
Step 2 Hang the hub on the screws with either the left side or right side mounting brackets so that:
 | Caution If you install the screws in drywall, use hollow wall anchors (1/8 inch by 5/16 inch) to secure the screws. If the screws are not properly anchored, the strain of the cables connected to the hub rear panel connectors could pull the hub from the wall. |
Cisco Connection Online (CCO) is Cisco Systems' primary, real-time support channel. Maintenance customers and partners can self-register on CCO to obtain additional information and services.
Available 24 hours a day, 7 days a week, CCO provides a wealth of standard and value-added services to Cisco's customers and business partners. CCO services include product information, product documentation, software updates, release notes, technical tips, the Bug Navigator, configuration notes, brochures, descriptions of service offerings, and download access to public and authorized files.
CCO serves a wide variety of users through two interfaces that are updated and enhanced simultaneously: a character-based version and a multimedia version that resides on the World Wide Web (WWW). The character-based CCO supports Zmodem, Kermit, Xmodem, FTP, and Internet e-mail, and it is excellent for quick access to information over lower bandwidths. The WWW version of CCO provides richly formatted documents with photographs, figures, graphics, and video, as well as hyperlinks to related information.
You can access CCO in the following ways:
For a copy of CCO's Frequently Asked Questions (FAQ), contact cco-help@cisco.com. For additional information, contact cco-team@cisco.com.
Cisco documentation and additional literature are available in a CD-ROM package, which ships with your product. The Documentation CD-ROM, a member of the Cisco Connection Family, is updated monthly. Therefore, it might be more current than printed documentation. To order additional copies of the Documentation CD-ROM, contact your local sales representative or call customer service. The CD-ROM package is available as a single package or as an annual subscription. You can also access Cisco documentation on the World Wide Web at http://www.cisco.com, http://www-china.cisco.com, or http://www-europe.cisco.com.
If you are reading Cisco product documentation on the World Wide Web, you can submit comments electronically. Click Feedback in the toolbar and select Documentation. After you complete the form, click Submit to send it to Cisco. We appreciate your comments.

![]()
![]()
![]()
![]()
![]()
![]()
![]()
![]()
Posted: Fri Sep 27 23:22:52 PDT 2002
All contents are Copyright © 1992--2002 Cisco Systems, Inc. All rights reserved.
Important Notices and Privacy Statement.