|
|

This chapter explains how to install the workgroup CDDI/FDDI EISA PC apapter NetWare driver in your PC. The installation instructions are separated into these sections:
Your workgroup CDDI/FDDI EISA PC Driver disk contains all the files you need to install the client and server drivers. The following NetWare loadable modules (NLMs) required by NetWare server Versions 4.x and 3.1x are located in the \novell\server \4.x or \novell\server \3.1x directories on the EISA PC Driver diskette and are shipped under license from Novell.
PATCHMAN.NLM
LSLENH.NLM
MSM31X.NLM
FDDITSM.NLM
MONITOR.NLM
ETHERTSM.NLM
Always use the latest version of these files. Novell is constantly updating these files, so the version shipped with your version of Novell NetWare may be more recent than the version included on the workgroup CDDI/FDDI EISA Driver disk. Before overwriting any files, compare the revision date to confirm that you are copying the most recent version to your server.
For the latest information the NetWare drivers, refer to the readme.txt file on the CDDI/FDDI EISA PC Adapter Driver disk.
The NetWare driver supports the following frame formats:
Before installing the NetWare driver, you must do the following:
The EISA PC adapter driver installation instructions vary depending on the version of NetWare software installed on your server. Proceed to the section describing the driver installation for the NetWare revision installed on your server:
The NetWare 4.x instructions are separated into two parts:
Go to the section describing your NetWare server installation.
Follow these steps to modify the NetWare 4.1x installation script to configure and install the EISA PC adapter driver.
Step 1 Run the NetWare 4.x installation script.
The following prompt appears.
Step 2 Select Yes.
The Special Required Startup Set Commands window appears. (See Figure 4-2.)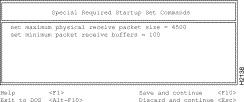
Step 3 Enter the following lines in the window:
set maximum physical receive packet size = 4500
set minimum packet receive buffers = 100
 | Caution You must enter these parameters exactly, or the server will use the default values and ABEND (abnormal end). Your packet size and receive buffer values may be higher than these minimum values. |
These additional lines allow the server to take advantage of the FDDI larger packet size and increases the number of receive buffers thus improving performance.
Step 4 Press the F10 key to save and continue.
Step 5 Continue with the NetWare installation script until the Load LAN Driver window appears. (See Figure 4-3.)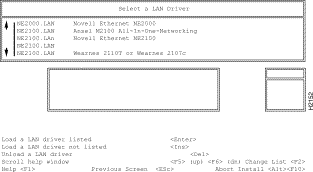
Step 6 Press Ins to Load a LAN driver not listed.
Step 7 Insert the workgroup CDDI/FDDI EISA PC Driver disk into the floppy disk drive.
A screen describing the default path to the drivers appears. (See Figure 4-4.)
Step 8 Press F3 to specify a different path.
A dialog box appears. (See Figure 4-5.)
Step 9 At the prompt, enter the full path to the NetWare 4.x drivers:
[drive letter]:\novell\server\4.x.
Step 10 The EISA adapter driver appears in the driver installation selection list. (See Figure 4-6.)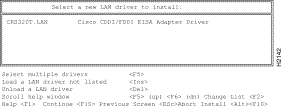
Step 11 Press Enter to select the Cisco CDDI/FDDI EISA Adapter Driver.
A driver installation confirmation screen appears. (See Figure 4-7.)
Step 12 Press Enter to continue.
Step 13 Continue with the installation through completion by answering the prompts.
Step 14 Proceed to the section "Editing the autoexec.ncf to Load a Driver with Different Frame Formats."
To install the EISA adapter driver on an existing NetWare 4.x server, perform the following steps:
Step 1 Run the NetWare 4.x upgrade installation script using the load install command.
The Select an Installation Method screen appears. (See Figure 4-8.)
Step 2 Select Maintenance/Selective Install and press Enter.
The Installation Options screen appears. (See Figure 4-9.)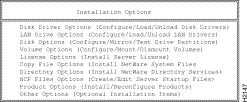
Step 3 Select NCF File Options and press Enter.
The Available NCF File Options screen appears. (See Figure 4-10.)
Step 4 Select Edit STARTUP.NCF file and press Enter.
The Boot Path Dialog screen appears. (See Figure 4-11.)
Step 5 Enter the path for the SERVER.EXE file and press Enter (For example: C:\SERVER.40).
The STARTUP.NCF file window appears. (See Figure 4-12.)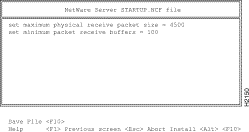
Step 6 Enter the following lines on the STARTUP.NCF file window.
set maximum physical receive packet size = 4500
set minimum packet receive buffers = 100
 | Caution You must enter these parameters exactly, or the server will use the default values and ABEND (abnormal end). Your packet size and receive buffer values may be higher than these minimum values. |
These additional lines allow the server to take advantage of FDDI larger packet size and increases the number of receive buffers, thus improving performance.
Step 7 Press F10 to save the file.
Step 8 Press Esc to return to the Installation Options screen. (See Figure 4-13.)
Step 9 Select LAN Driver Options and press Enter.
The Select a LAN Driver screen appears. (See Figure 4-14.)
Step 10 Press Ins to load a LAN driver that is not listed.
Step 11 Insert the workgroup CDDI/FDDI EISA PC Driver disk into the floppy disk drive.
A screen describing the default path to the drivers appears. (See Figure 4-15.)
Step 12 Press F3 to specify a different path and a dialog screen appears. (See Figure 4-16.)
Step 13 Enter the full path to the EISA drivers and press Enter:
[drive letter]:\novell\server\4.x
The Cisco CDDI/FDDI EISA adapter driver appears in the driver installation selection list. (See Figure 4-17.)
Step 14 Select Cisco CDDI/FDDI EISA Adapter Driver.
Step 15 Press Enter to load.
Step 16 A driver installation confirmation screen appears. (See Figure 4-18.)
Step 17 Press Enter to continue.
Step 18 Proceed to the section "Editing the autoexec.ncf to Load a Driver with Different Frame Formats."
To install the CDDI/FDDI EISA adapter driver on an installed and configured NetWare 3.12 server, perform the following steps:
Step 1 From the DOS prompt, copy the following files from the EISA PC Driver diskette to the DOS partition of the NetWare server:
CRS320T.LAN
MSM31X.NLM
FDDITSM.NLM
Typically the DOS partition of the of the NetWare server is C:\NETWARE. Yours may be different.
Step 2 Add the following lines to the startup.ncf file. (See the example of a startup.ncf file in the \novell\server\3.1x\samples directory of the EISA PC adapter driver disk.)
set maximum physical receive packet size = 4500
set minimum packet receive buffers = 100
 | Caution You must enter these parameters exactly, or the server will use the default values and ABEND (abnormal end). Your packet size and receive buffer values may be higher than these minimum values. |
These additional lines allow the server to take advantage of the FDDI larger packet size and increases the number of receive buffers, thus improving performance.
Step 3 Add the following load commands to the autoexec.ncf file:
load c:\netware\msm31x
load c:\netware\fdditsm
Step 4 Proceed to the section "Editing the autoexec.ncf to Load a Driver with Different Frame Formats."
To install the CDDI/FDDI EISA adapter driver on an installed and configured NetWare 3.11 server, perform the following steps:
Step 1 From the DOS prompt, copy the following files from the EISA PC Driver diskette to the DOS partition of the NetWare server:
CRS320T.LAN
PATCHMAN.NLM
LSLENH.NLM
MSM31X.NLM
FDDITSM.NLM
ETHERTSM.NLM
MONITOR.NLM
Always use the latest version of these files. Novell is constantly updating these files, so the version shipped with your version of Novell NetWare may be more recent than the version included on the workgroup CDDI/FDDI EISA Driver disk. Before overwriting any files, compare the revision date to confirm that you are copying the most recent version to your server.
Typically the DOS partition of the of the NetWare server is C:\NETWARE. Yours may be different.
Step 2 Add the following lines to the startup.ncf file. (See the example of a startup.ncf file in the \novell\server\3.1x\samples directory of the EISA PC adapter driver disk.)
set maximum physical receive packet size = 4202
set minimum packet receive buffers = 100
 | Caution You must enter these parameters exactly, or the server will use the default values and ABEND (abnormal end). Your packet size and receive buffer values may be higher than these minimum values. |
These additional lines allow the server to take advantage of the FDDI larger packet size and increases the number of receive buffers, thus improving performance.
Step 3 Add the following load commands to the autoexec.ncf file:
load c:\netware\patchman
load c:\netware\lslenh
load c:\netware\msm31x
load c:\netware\fdditsm
Step 4 Proceed to the section "Editing the autoexec.ncf to Load a Driver with Different Frame Formats."
The autoexec.ncf file must be modified to load the following:
The load command format follows:
load crs320T slot=[physical slot number] name=[variable] frame=[frame format]
See examples of load and bind commands for four different protocol types in the section "Binding Protocol to Frame Format Examples."
Before the changes made to the files can take effect you must restart the server using the NetWare down and exit commands, as follows:
Step 1 Remove the EISA PC Driver Disk from the floppy drive.
Step 2 Enter down and exit to restart the server.
Step 3 Verify the installation by logging into the server from a client station.
Each client PC attached to the NetWare network server using the workgroup CDDI/FDDI EISA PC adapter must have the client drivers installed.
Installing the client drivers involves the following tasks:
To install the client driver files on your EISA PC, use the DOS copy command to copy the following files to the server root directory from the \novell\client directory of the workgroup CDDI/FDDI EISA Driver disk.
CRS320T.COM
LSL.COM
IPXODI.COM
NETX.EXE
(For example: COPY A:\NOVELL\CLIENT\CRS320T.COM C:\)
Modify the autoexec.bat to include the following lines to execute the Novell drivers and the CDDI/FDDI EISA adapter drivers when the client reboots:
C:\LSL.COM
C:\CRS320T.COM
C:\IPXODI.COM
C:\NETX.EXE
Make sure there are no shared-memory conflicts with other boards or programs, such as TSR (terminate-stay-resident) programs.
When loading EMM386.EXE in the config.sys, add x=c800-c9ff if the EISA PC adapter was assigned address c800 by the EISA configuration utility.
The client driver can be loaded high by using the DOS loadhigh command. This allocates more space for application programs. You will need to use a memory manager, such as EMM386.EXE or QEMM.EXE, to use the upper memory.
Modify the net.cfg file to link Novell drivers and EISA NetWare driver and the proper frame format for the network protocol type supported.
The net.cfg file must be modified as follows:
If you are using the FDDI_802.2 frame format, add the following lines to the net.cfg:
link driver crs320T
frame FDDI_802.2
The space before the word frame in the second line of the previous example is required to properly format the command. The client driver default frame format is FDDI_802.2. A net.cfg file is not needed if the frame format is FDDI_802.2.
If you are using the FDDI_SNAP frame format, add the following lines to the net.cfg:
link driver crs320T
frame FDDI_SNAP
The space before the word frame in the second line of the previous example is required to properly format the command.
Before the changes made to the autoexec.bat and net.cfg files can take effect, you must reboot the client workstation as follows:
Step 1 Remove the EISA PC Driver disk from the floppy drive.
Step 2 Reboot the PC to load the drivers.
Step 3 Verify the installation by logging into a server.
![]()
![]()
![]()
![]()
![]()
![]()
![]()
![]()
Posted: Fri Sep 27 08:11:53 PDT 2002
All contents are Copyright © 1992--2002 Cisco Systems, Inc. All rights reserved.
Important Notices and Privacy Statement.